I know how stressful it is when your excavator makes strange noises. I have seen many owners ignore small squeaks only to face a massive repair bill later on the job.
You should replace excavator undercarriage parts when wear exceeds the manufacturer’s limits, usually around 100% wear, or when you see structural damage like cracks and leaks. Routine measurements of track tension, link height, and roller diameter help you plan replacements before a total breakdown occurs.
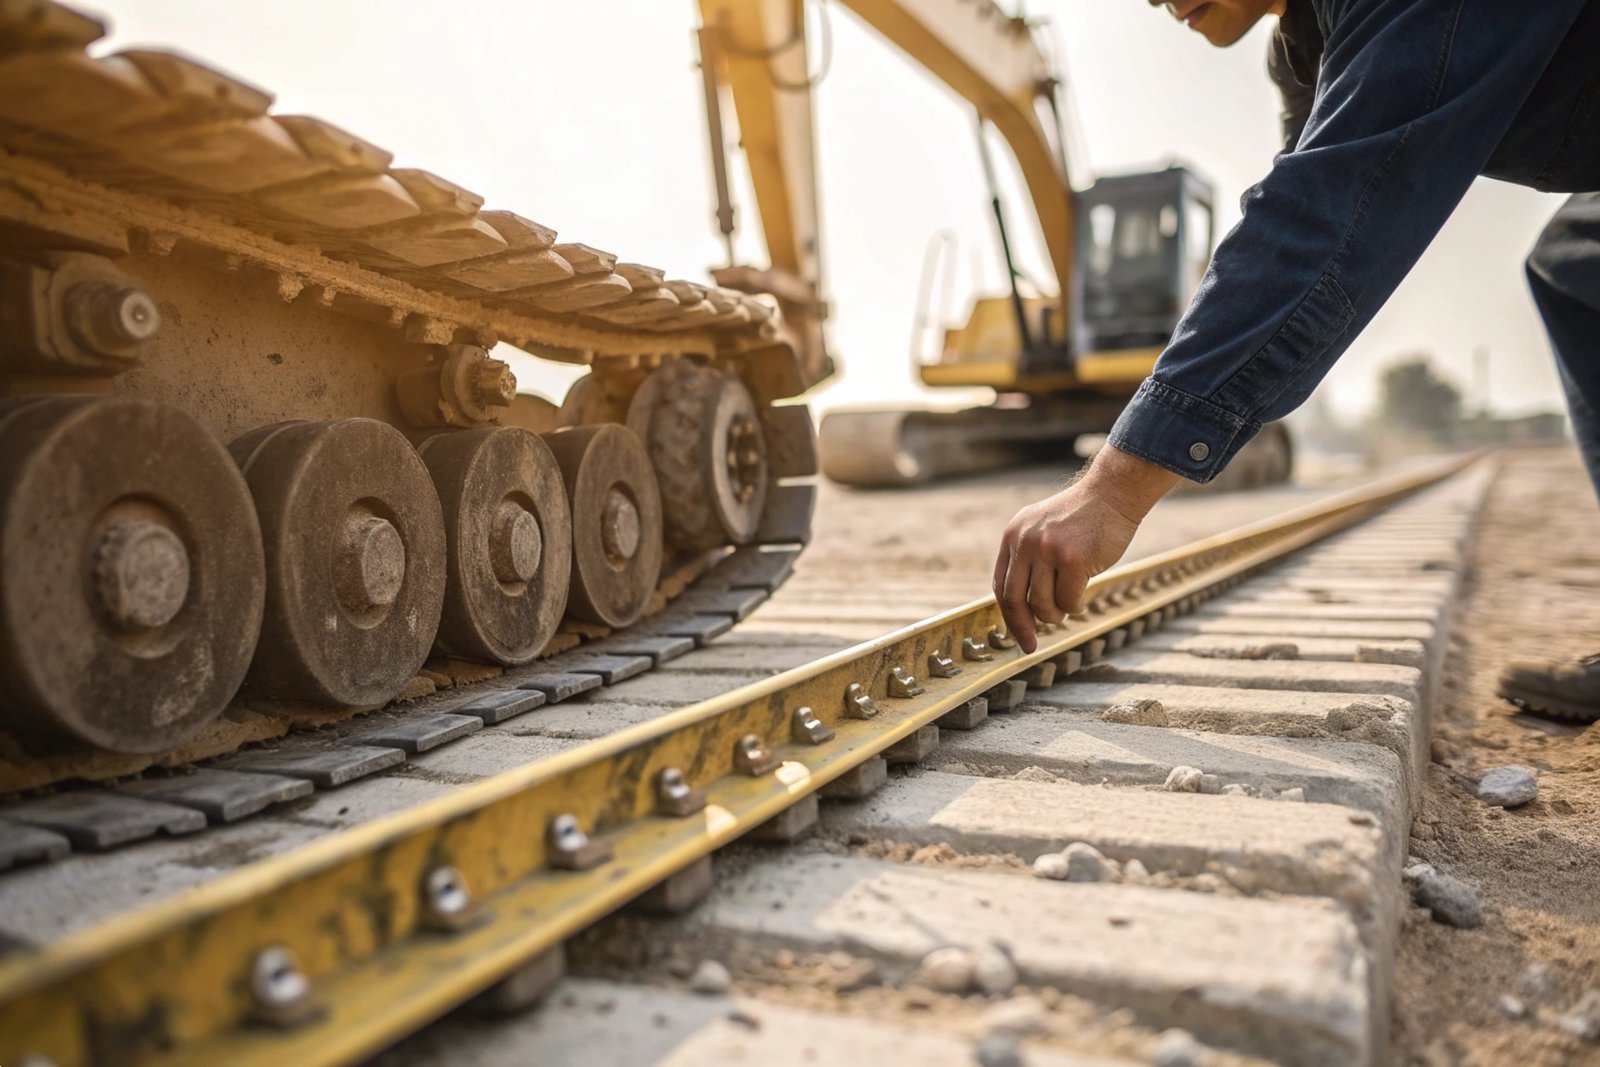
Checking your undercarriage might seem like a hard job, but it is the best way to save money. If you keep reading, I will show you exactly how to measure your parts like a professional.
How do I measure the percentage of wear on my track links and rollers accurately?
I always tell my clients that you cannot guess when it comes to steel. I used to see people just look at a part and say it "looks okay," but that is how accidents happen.
To measure wear accurately, use a depth gauge or ultrasonic tool to check the height of track links and the diameter of rollers. Compare these numbers to the OEM wear chart; 0% is new, and 100% means the part has reached its full service life.

Using Professional Tools for Precision
When I work with big fleets, we use ultrasonic testers 1. These tools send a sound wave through the metal to find the exact thickness. If you do not have one, a simple ruler or a caliper works well too. You must clean the dirt off the parts first. If there is mud on the link, your measurement will be wrong.
I recommend measuring the track link height in at least three different spots. This helps you see if the wear is even. If one side is much lower than the other, you might have an alignment problem 2.
Understanding the Wear Chart
Every brand, like Caterpillar or Komatsu, has a specific chart. These charts tell you the "Service Limit." For example, if a new link is 100mm high and the limit is 80mm, once you hit 80mm, you are at 100% wear.
| Component | New Measurement (Example) | 100% Wear Limit | Current Action |
|---|---|---|---|
| Track Link Height | 120 mm | 105 mm | Replace if < 105 mm |
| Roller Diameter | 200 mm | 175 mm | Replace if < 175 mm |
| Bushing Diameter | 60 mm | 52 mm | Turn or Replace |
Why Consistent Tracking Matters
I keep a logbook for every machine I service. If you measure your undercarriage every 250 hours, you can see a pattern. If you see that you lost 2mm of steel in the last month, you can predict exactly when you will need to buy replacement undercarriage parts 3 from us at Dingtai. This stops you from being surprised by a broken machine on a Tuesday morning.
What are the visual signs that my sprocket teeth have reached their service limit?
I often walk up to a machine and see sprockets that look like shark fins. I know immediately that the owner is wasting money because those sharp teeth are destroying the new track bushings.
Visual signs of sprocket wear include "root wear" where the teeth get deep grooves, "shark-finning" where the tips become sharp, and side wear. If the teeth are pointed or thin, the sprocket will no longer grip the track chain correctly.

Identifying the "Shark Fin" Shape
A healthy sprocket tooth has a flat or rounded top. As it works in abrasive soil 4, the metal rubs away. The tooth becomes thin and sharp. I call this the "shark fin" look. Once the teeth are sharp, they stop pushing the track smoothly. Instead, they start to "jump" or skip. This creates a lot of vibration that you can feel in the cab.
Checking the Root of the Tooth
The "root" is the bottom area between two teeth. This is where the bushing sits. If the root is worn deep, the bushing will slide around too much. I have seen cases where the root wear was so bad that the track chain 5 stayed loose no matter how much the operator tightened the tensioner.
Examining Side Wear and Chipping
Look at the sides of the sprocket. If the sides are shiny or scraped, your machine is not walking straight. At Dingtai, we make sure our sprockets have the right hardness. If you see chunks of metal missing (chipping), it means the metal was either too brittle or the machine hit something very hard.
| Visual Sign | Problem Indicated | Risk Level |
|---|---|---|
| Pointed Tips | Thin teeth (Shark fin) | High - Can snap teeth |
| Deep Grooves in Root | Incorrect bushing fit | Medium - Causes chain slack |
| Shiny Sides | Misalignment | Low - Fix track guides |
Why is "pin and bushing turn" a critical decision point for my maintenance budget?
I remember a customer who didn't want to spend money on a "turn." He waited too long, and eventually, the bushings wore through to the pins. He ended up buying a whole new chain, which cost him three times more.
A "pin and bushing turn" involves flipping the pins and bushings 180 degrees to expose the unworn side. This can double the life of your track chain for a fraction of the cost of a new assembly, provided the external wear has not exceeded 100%.

How the Turn Saves Money
Inside every track link is a pin and a bushing. The bushing only rubs against the sprocket on one side. By taking the chain apart and rotating these parts, you get a fresh surface. It is like flipping a pancake. You use the other side that is still strong. This is a very smart move for B2B fleet managers 6 who need to keep costs low.
The Timing Must Be Perfect
You cannot do a turn if you wait too long. If the bushing wall is too thin, it will crack during the turn. I usually recommend a turn when the bushing is at 75% to 85% wear. If you see the pin through a hole in the bushing, it is too late. You must buy a new chain from a reliable supplier 7 like us.
Impact on Internal Wear
Even if the outside looks good, the inside of the link can stretch. We call this pitch elongation 8. When the pins and bushings wear internally, the chain gets longer. A turn helps reset the internal seal and grease in some types of tracks, which keeps the chain tight and prevents it from coming off the machine.
How can I tell if a leaking seal in my idler requires immediate replacement to avoid core damage?
I hate seeing a puddle of oil under an idler. It tells me that a small $20 seal is about to destroy a $500 part. I always tell my team: "Fix the leak today, or replace the whole unit tomorrow."
A leaking seal in an idler requires immediate replacement if you see "wet" oil dripping or if the idler feels hot to the touch. Once the oil is gone, the internal bearings will seize, causing the idler to stop turning and flat-spotting the track.

Detecting the Leak Early
Sometimes the leak is hard to see because of the mud. I use a clean rag to wipe the side of the idler hub. If I see fresh, clear oil, I know the seal is broken. If the oil is mixed with dirt and looks like thick paste, it has been leaking for a long time. This is a major warning sign.
The Heat Test
I often use an infrared thermometer 9 to check the temperature of the rollers and idlers after the machine has been working for an hour. If one idler is 80°C and the others are 50°C, the one that is hot has no oil. The metal is rubbing against metal. This friction will melt the internal parts very quickly.
Avoiding Flat Spots
If the idler seizes and stops spinning, the track chain will just slide over it. This will wear a flat spot into the idler. Once you have a flat spot, the idler is garbage. You cannot repair it. By catching the seal leak early, you save the heavy steel "core" of the idler and only have to replace the bearings and seals 10.
| Symptom | Internal Condition | Urgency |
|---|---|---|
| Wet Oil Drip | Seal failure | High - Replace seal now |
| Hot Hub (>80°C) | No lubrication / Friction | Critical - Stop machine |
| Squeaking Noise | Metal-on-metal contact | Critical - Seizure imminent |
Conclusion
Replacing parts at the right time keeps your machine running and your costs low. Watch for shark-fin teeth, measure your links, and never ignore an oil leak on your rollers.
Footnotes
1. Learn how ultrasonic testers provide non-destructive thickness measurements for heavy equipment maintenance. ↩︎
2. Expert tips on diagnosing and fixing undercarriage alignment issues in excavators. ↩︎
3. A community resource for discussing heavy equipment repairs and replacement part sourcing. ↩︎
4. Scientific explanation of how abrasive soil conditions accelerate metal wear in construction machinery. ↩︎
5. Comprehensive guide to maintaining track chains and preventing premature undercarriage failure. ↩︎
6. Definition and best practices for managing large fleets of industrial vehicles and equipment. ↩︎
7. A directory of top-rated manufacturers and suppliers for heavy machinery components. ↩︎
8. Detailed technical breakdown of how pitch elongation occurs in drive and track chains. ↩︎
9. Guide to using infrared thermometers for mechanical diagnostics and heat detection. ↩︎
10. Information on high-quality bearings and seals required for heavy-duty industrial applications. ↩︎